
A grease gun that stops delivering grease almost always tells you something specific: there is air where grease should be, the grease is too stiff to move, the path ahead is blocked, or a seal has stopped holding pressure. The useful skill is not memorizing a single fix — it is reading the symptom so you test the right thing first.
This guide is written around cordless (battery-powered) grease guns, because that is where most of the confusing symptoms show up: the motor spins, the battery is charged, and still nothing comes out of the coupler. Most of the checks below also apply to manual lever and pistol guns, and where the behavior differs, the difference is called out.
Key takeaways
A cordless gun that runs but does not dispense is usually a supply problem (air, empty tube, blocked check valve, blocked line), not a motor problem.
Air is the most common cause of lost prime, and it re-enters through loading mistakes, an unseated follower, or a loose tube-to-head connection.
Grease consistency is graded on the NLGI scale; many battery guns are rated for grease up to NLGI 2, and cold grease behaves like a harder grade than its label.
A relief valve that discharges grease, or a circuit breaker that trips, is a diagnostic signal pointing at a blockage downstream — not a fault in the gun.
Couplers that will not release are a pressure and fit issue; release them by relieving pressure, never by twisting or prying.
Replace a coupler when grip, sealing or jaw engagement has degraded — cleaning will not restore worn jaws.
Why Is My Grease Gun Pumping Slowly? Causes and Solutions
Slow delivery is the most misread symptom in greasing, because some resistance is normal. A gun pushing grease into a bearing has to overcome the bearing’s own back pressure, the length and diameter of the hose, the restriction of the coupler and fitting, and the stiffness of the grease itself. The question is whether the gun is working harder than it should, or whether it is working normally against a genuinely tight path.
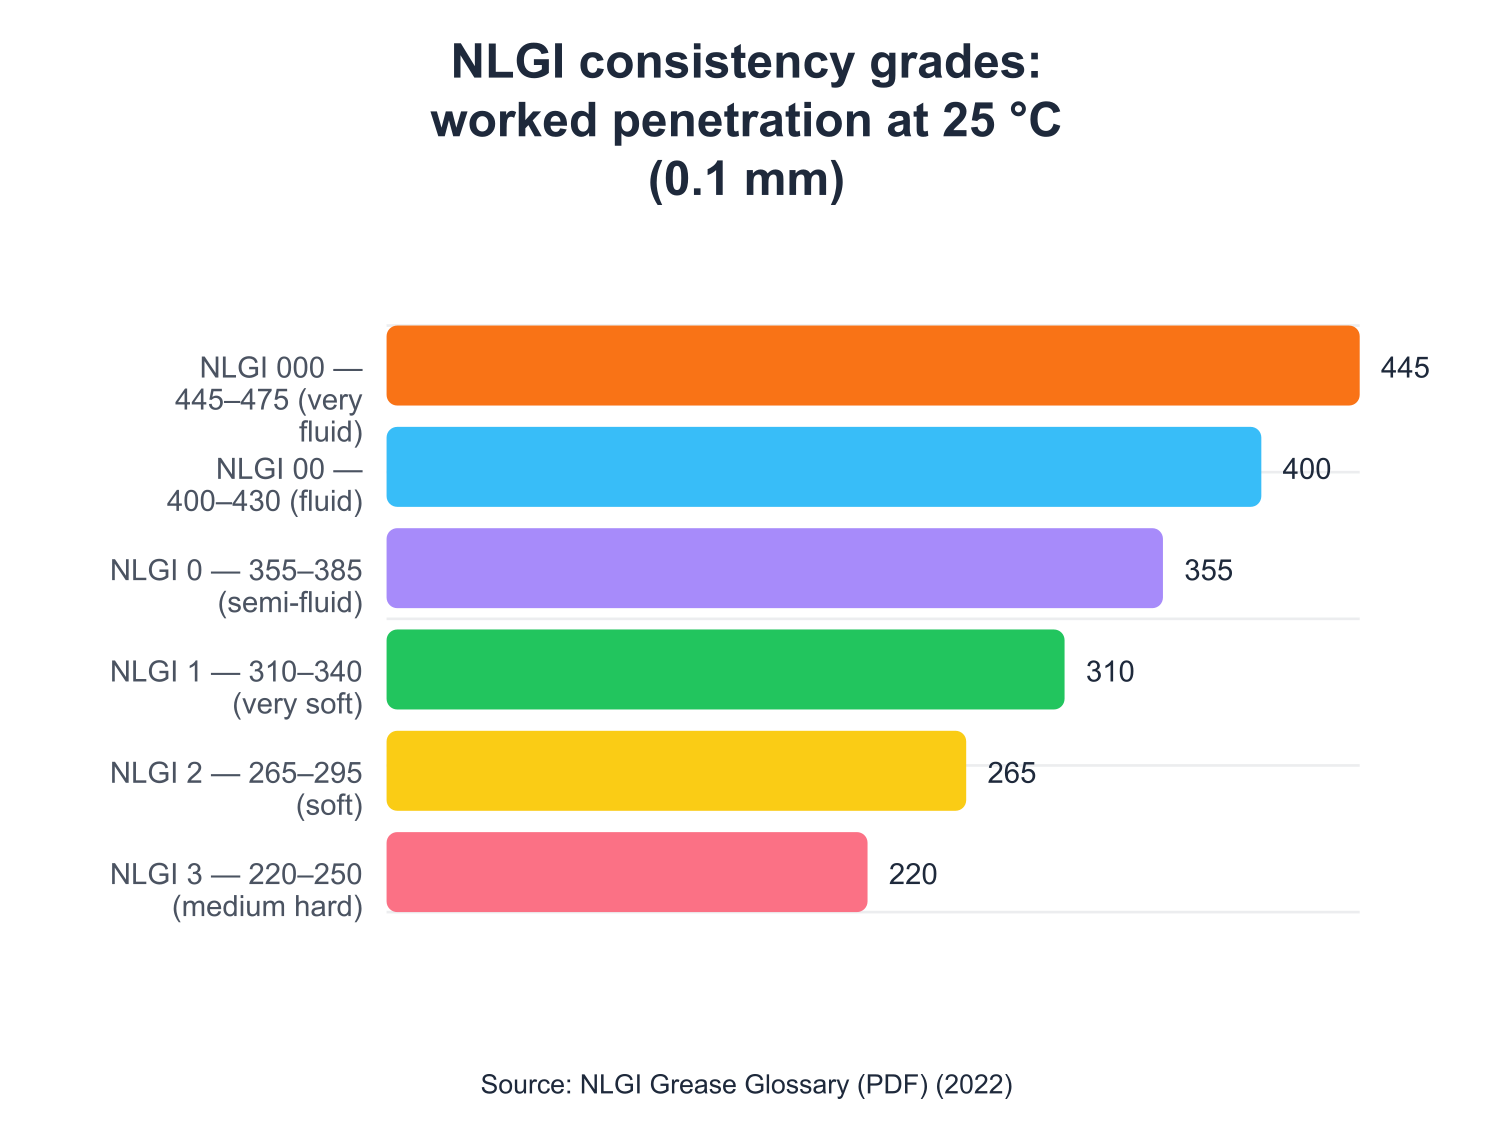
Worked penetration ranges for NLGI grades 000–3, measured by ASTM D217 at 25 °C (77 °F). A lower penetration number means a stiffer grease. These are consistency ranges only: pumpability in a cordless gun also depends on base-oil viscosity, thickener type, temperature and the resistance of the hose, coupler and fitting.
Normal high resistance looks like this: the gun slows or labors as the bearing fills, the hose stiffens slightly, and delivery picks up again at the next fitting. Cold weather makes every one of these effects stronger. Abnormal resistance looks different: the gun is slow on every fitting, including ones that were easy last week; the relief valve weeps grease; the motor labors or the circuit breaker trips; or output drops steadily over a session rather than varying with the fitting.
Five factors explain most slow-pumping cases:
Grease consistency. Grease is classified by NLGI grade, based on worked penetration at 25 °C (77 °F). Grade 2 sits at 265–295 (0.1 mm), grade 3 at 220–250, and grade 1 at 310–340 — so a higher number means a stiffer grease (NLGI Grease Glossary). A gun rated for NLGI 2 will be noticeably slower on NLGI 3, and may not move it at all in the cold.
Low-temperature pumpability. Cold thickens the base oil and stiffens the thickener structure, so the same grease that flowed easily at 70 °F can behave like two grades harder at 20 °F. Grease selection guidance for cold climates points toward softer grease with more oil and less thickener, and toward confirming the lowest expected working temperature with the grease supplier (Graco).
Supply-path restriction. A long hose, a partially clogged coupler, a dirty fitting, or a collapsed or kinked hose all add resistance. A blocked grease line is described in one manual as making it harder to squeeze the gun handle — the same restriction a cordless gun feels as slow, strained delivery (Harbor Freight 64381).
Air pockets. Trapped air compresses instead of transmitting force, so each stroke delivers less grease and the gun feels spongy or inconsistent rather than uniformly stiff.
Component wear. A worn plunger, a tired check valve spring, or a follower seal that no longer wipes the tube wall all reduce the volume actually pumped per stroke, which reads as slow delivery even when nothing is blocked.
A practical way to separate normal from abnormal: try the same gun on a known-good fitting on a different machine. If it is still slow, the problem is in the gun, the grease or the hose. If it speeds up, the original fitting or bearing was the restriction, and the gun was simply reporting it.
Grease Gun Works but No Grease Comes Out: What to Check
This is the classic cordless complaint: the trigger works, the motor runs, the battery is charged, and no grease appears. The first split to make is between a motor or power fault and a grease-supply fault. They sound similar and are fixed in completely different places.
Signs the fault is electrical or motor-side:
No motor sound at all when the trigger is pressed.
The motor runs but the gearbox or plunger makes no reciprocating movement.
The gun cuts out after a few seconds of load and recovers after a pause — on tools fitted with a circuit breaker, this is the breaker protecting the motor when the gun is run continuously at maximum pressure (Lincoln PowerLuber manual).
The battery display shows a low charge, or the pack will not accept charge.
Signs the fault is in the grease supply:
The motor runs and the gun sounds normal, but nothing exits the coupler.
Grease appears at the relief valve or vent valve instead of at the fitting.
The gun primes and delivers, then loses delivery again after a few strokes.
Delivery is fine on one fitting and absent on the next.
Once you have placed the fault on the supply side, work through this order — it moves from cheapest and most likely to most involved:
Confirm there is grease in the tube. A gun that is out of grease behaves exactly like a gun with a supply fault. Check that the tube assembly actually contains grease before anything else.
Re-prime. Air pockets in the grease are the most probable cause when grease stops coming out mid-session, and the fix is to bleed the gun rather than to keep pulling the trigger (John Deere service tips).
Check the vent or purge valve. If grease escapes from the vent valve rather than the coupler, the manual’s troubleshooting points to a blocked lubrication point or a clogged hose — check, clean or replace the hose (Pressol operating instructions).
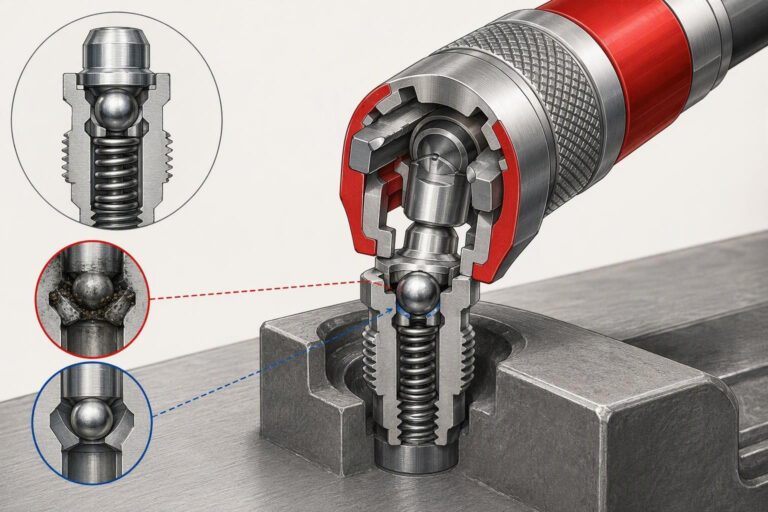
Check the coupler and fitting. A coupler that is not fully seated, or a fitting with a stuck check ball, will not accept grease. Swap to a known-good fitting to test.
Clean the outlet check valve. Contamination in the outlet check valve is a documented cause of battery grease guns failing to dispense, and it can be cleared by cleaning the valve and its seat (John Deere; Sealey CPG12V).
Check the follower. If the rubber follower did not enter the cartridge, the grease has nothing pushing it toward the pump. Reposition the plunger rod so the follower seats inside the cartridge (Harbor Freight 64381).
If steps 1–6 all pass and the gun still will not deliver, the fault is inside the pump assembly and belongs with a service technician or the manufacturer’s support channel rather than in field disassembly.
Priming & Loading Issues
The frustrating pattern with priming is the repeat: you bleed the gun, it works for a while, then it loses prime again. Understanding why that happens is more useful than repeating the bleed procedure a fourth time.
Why an already-primed gun loses prime again. Priming removes the air that is currently in the pump and hose. It does not remove air that is still trapped in the grease inside the cartridge, and it does not fix a follower that is not sealing against the tube wall. Both of those keep feeding new air into the pump as the grease is consumed. One manufacturer states the mechanism plainly: air pockets in the cartridge lubricant will cause the gun to lose its prime, and a follower that binds in the tube is a listed cause of a gun that continues to lose prime (Lincoln PowerLuber manual).
How loading introduces air. Air gets in through several distinct routes:
The cartridge seal is opened at the wrong moment. If the pull-off closure is removed before the cartridge is seated in the tube, or the head is left off while the grease is exposed, air sits on top of the grease column.
The head is tightened before the air is displaced. Leaving the head a couple of turns loose while the plunger is pushed in lets trapped air escape past the threads before the connection is sealed.
Bulk filling traps air throughout the tube. A gun filled from a bulk container can hold air in several locations in the tube assembly, which one manual lists as a possible cause of continued prime loss after bulk filling.
The follower seal is facing the wrong way. The follower seal lip has a correct direction for cartridge loading; if it is reversed, the follower cannot wipe the tube wall and air passes it.
The follower never entered the cartridge. If the follower is caught on the cartridge rim, the grease is never pushed forward and the pump draws air instead.
How the push rod and seals affect supply. The follower helps keep grease under the pump inlet. When the follower seal is damaged, grease leaks past it toward the back of the gun — one manual lists a damaged rubber follower on the plunger rod as one cause of grease leaking from the back of the gun, with replacement as the fix, and lists thin grease as another (Harbor Freight 64381). A follower that binds, or a rod that is not properly engaged with the follower, produces the same result from the other direction: the rod moves but the grease does not.
Checking against the tool’s own instructions. Every cordless gun has a specific loading and venting sequence, and the sequence matters more than it looks. Typical manufacturer steps include: pull the follower rod back and latch it before removing or installing the tube; remove the plastic cap and insert the cartridge before tearing off the pull-off closure; screw the tube assembly back on securely; release the follower rod; then purge air using the vent valve (Lincoln; Pressol). Some guns also specify packing grease into the cavity at the entrance of the gun assembly before the filled tube is attached, so the pump has grease to draw on its first strokes (Sealey CPG12V). Follow your own manual’s order exactly; skipping the cavity pack or the latch step is a common reason a gun primes once and then fails again.
Grease Gun Not Working After Changing the Cartridge?
A gun that worked before the cartridge change and fails immediately after points at the changeover itself. Rather than repeating the general priming procedure, check the five things that a cartridge swap can get wrong.
1. Cartridge orientation and standard. Cartridges are not all identical. One battery gun’s manual lists using a cartridge that does not conform to the DIN 1284 standard as foreseeable misuse, and the same manual specifies filling with a DIN 1284 cartridge (Pressol). Check that the cartridge physically seats in the tube and that the open end faces the pump head.
2. The sealing caps. A cartridge has a plastic cap on one end and a pull-off closure on the other. The plastic cap comes off before insertion; the pull-off closure is torn off only after the cartridge is in the tube and before the head is screwed on. Removing the wrong one at the wrong time either spills grease or leaves a barrier between the grease and the pump.
3. Follower position and engagement. The follower rod must be pulled back and latched into the tube cap slot before the tube is removed, and released only after the new cartridge is in place and the tube is threaded back on. If the rod is released while the tube is off, the follower can slam forward or seat crookedly, and it may then catch on the cartridge rim instead of entering it.
4. Air introduced during the swap. Opening the tube exposes the grease column to air, and a new cartridge can itself contain air pockets. This is why priming after every refill or cartridge change is a manufacturer instruction, not an optional step .
5. The tube-to-head connection. The tube must be threaded on securely and squarely. A cross-threaded or loose tube lets air into the pump on every stroke, which produces the pattern people describe as “it primes but won’t stay primed.” Where the manual calls for thread sealant on accessory connections, use it.
Why the fault repeats even after you prime. If any one of items 1–5 is still wrong, the gun will prime successfully — because you removed the air that was in the pump — and then lose prime again within a few strokes, because the underlying route for new air is still open. The tell is timing: a gun that fails within the first few strokes after a cartridge change has a loading fault; a gun that runs for a long time and then fails has a supply or blockage fault. If the gun primes, delivers normally for most of the cartridge, and then stops near the end, the cartridge is simply empty and the follower has reached the end of its travel.
Grease Gun Coupler Stuck on a Zerk Fitting? How to Remove It Safely
A coupler that will not come off can be difficult to release for more than one reason. On older Grease Couplers, a clogged fitting can create back pressure in the hose and coupler, making the thumb lever hard to depress and the coupler hard to remove .
Relieve pressure before anything else. Stop the gun, release the trigger, and use the gun’s pressure relief or vent valve as described in its manual. Do not loosen the hose connection or unscrew the coupler from the hose while the system is pressurized. A grease gun can generate very high pressure, and injection injuries from pressurized grease are serious — a doctor should check any injection injury immediately, even if it looks minor .
Then work the release mechanism, not the coupler body. On couplers with a thumb lever, apply steady light pressure to the lever — pliers may be needed on a stiff lever — and let it pop off. Resist twisting or jerking the coupler sideways, which can damage the seal . On push-on couplers, tilt and twist the coupler as the manual describes rather than pulling straight back against the jaws.
If it still will not release, the fitting is probably the problem. A blocked or damaged zerk holds pressure and grips the coupler. Once the coupler is off, treat the fitting: clear it, or replace it. A fitting that has been deformed by repeated greasing or by a coupler that was forced onto it will keep causing the same stuck-coupler symptom until it is changed.
Size and type mismatch. Couplers are made for specific fitting families and head diameters. A coupler whose grip range does not match the fitting will either not lock or lock too aggressively and jam. If the same coupler sticks on one machine’s fittings and releases cleanly on another’s, the mismatch is with those fittings, not with the coupler’s release mechanism.
When Should You Replace a Grease Gun Coupler?
Cleaning a coupler restores the jaws’ freedom of movement, but it cannot restore metal that has worn away. Replacement becomes the right answer when the coupler’s core job — gripping the fitting and sealing against it — has degraded.
Wear signs that point to replacement:
Grip loss. The coupler no longer stays on the fitting under pressure and has to be held by hand. Hardened jaws are rated for many thousands of cycles, but abrasive contamination accelerates wear, and inserts should be replaced when grip weakens.
Leakage at the coupler. Grease escaping around the coupler-to-fitting joint means the seal is no longer sealing. On rebuildable couplers, the seal is a replaceable part; on sealed couplers, the assembly is replaced .
Jaws that will not engage or release cleanly even after cleaning and lubrication.
Visible deformation or cracking of the coupler body or jaw cage.
Why cleaning sometimes does not restore delivery. A coupler can be clean and still fail to grease, for three reasons. First, worn jaws hold the coupler slightly off-axis, so the tip does not depress the fitting’s check ball far enough to open it. Second, a hardened grease plug can sit inside the coupler’s own passage, past the point any external cleaning reaches. Third, the fitting itself may be the blocked component — a coupler swap will not fix a clogged zerk, and the fitting has to be cleared or replaced.
Compatibility checks before buying. Confirm the thread that connects the coupler to your hose (common sizes include 1/8″ NPT male and female, and BSP variants), the fitting types and head diameters you actually grease, and the working pressure rating relative to your gun. Published coupler ratings range from roughly 3,600 to 12,000 PSI depending on model, and cycle-life figures vary widely between light-duty and heavy-duty designs . A coupler rated below your gun’s maximum output is the wrong part regardless of how well it fits.
Cordless Grease Gun Troubleshooting
Cordless guns add a power system and a gearbox to everything a manual gun does, which means more places for a fault to hide — but also more diagnostic signals to read. Work through the categories below in order; each one ends with a clear next step.
The motor does not run at all
Check the battery first: charge it, then confirm the display or indicator shows charge. If the pack will not charge, check that the charger has power and that the pack is not damaged. If the battery is good and the motor is silent, the fault is in the switch, wiring or motor and belongs with service — do not open the pump unit, which typically voids the warranty.
The motor runs but delivery stops under load
If the gun runs, strains, and then cuts out — recovering after a pause — the protection device is doing its job. On guns with a circuit breaker, the breaker stops the motor when the gun is run continuously at maximum pressure, and a tripped breaker indicates a clogged or tight bearing, a clogged grease fitting or a blocked lubrication line . Clear the downstream restriction before resetting and continuing. On guns with a pressure relief valve, grease discharging from the valve is the same message: there is a clog in the fitting, line or bearing that must be corrected before proceeding.
The motor runs normally but no grease appears
This is the supply-side fault covered earlier: empty tube, air, blocked check valve, blocked hose, unseated follower, or a coupler that is not gripping. Test in that order. A quick discriminator: disconnect the hose at the gun head and run the gun briefly against a safe receptacle. Grease at the head means the fault is downstream (hose, coupler, fitting); no grease at the head means the fault is in the pump or supply.
Delivery is weak or intermittent
Suspect air first, then cold grease, then wear. Air produces a spongy, inconsistent stroke; cold grease produces uniform slowness that improves as the gun and grease warm; wear produces a gradual decline in output over weeks. If the gun is rated for grease up to NLGI 2, confirm the grease you are using is within that grade at the actual working temperature, not just at room temperature.
Grease leaks from the gun body or vent
Grease at the vent valve usually means a blocked point or hose downstream. Grease at the back of the gun points to a damaged follower seal or a grease that is too thin for the gun . Grease at the tube-to-head joint points to a loose tube or a failed gasket.
The gun loses prime repeatedly
Repeated prime loss is a loading or follower problem, not a pump problem. Recheck the follower seal direction, confirm the follower enters the cartridge, and confirm the tube is fully seated. If the gun has a vent valve, use it as the manual describes rather than relying on trigger pulls alone.
The coupler will not release or will not seal
Relieve pressure, then inspect the coupler jaws and the fitting. Replace the coupler if grip or sealing has degraded; replace or clear the fitting if it is blocked or deformed.
Routine checks that prevent most of the above
Before each use, check the general condition of the gun, look for damaged hoses, cracked components or abnormal noises, and clean grease residue from the exterior. Store the gun with the battery removed, in a clean dry place . Prime after every refill and before lubricating, and check for prime before each greasing session rather than after the first fitting refuses grease.
FAQ
Why does my cordless grease gun run but not pump grease?
Because the motor and the grease supply are separate systems. The motor can run perfectly while the pump draws air, the check valve is clogged, the hose is blocked, or the follower is not pushing grease into the pump. Check the supply side first: grease in the tube, prime, vent valve, check valve, hose and coupler.
How do I know if the problem is the motor or the grease system?
Listen and watch. No motor sound at all, or a motor that runs without any reciprocating action, points to the power or drive side. A motor that runs normally but produces no grease at the coupler points to the supply side. A gun that cuts out under load and recovers is usually signalling a downstream blockage through its breaker or relief valve.
Why does my grease gun lose prime again right after I bleed it?
Because bleeding removes the air in the pump, not the air still trapped in the grease or entering through a bad seal. A follower that binds or does not enter the cartridge, a reversed follower seal, or a loose tube connection will keep introducing air, so the gun primes and then fails again within a few strokes.
Why is my grease gun slow in winter but fine in summer?
Cold thickens grease and raises the pressure needed to move it through the hose and coupler. Some slowdown is normal. If the gun stalls, the breaker trips, or the relief valve discharges, the grease is too stiff for the conditions — switch to a grease rated for lower temperatures or warm the gun and grease before use.
How do I get a stuck coupler off a zerk fitting?
Stop the gun and relieve pressure using the gun’s relief or vent valve. Then apply steady pressure to the coupler’s release lever — pliers may help on a stiff lever — and let it release. Do not twist or pry the coupler sideways, and never loosen a pressurized connection. If it still will not release, the fitting is likely blocked or damaged and needs to be cleared or replaced.
How often should I replace a grease gun coupler?
Replace it when grip, sealing or jaw movement has degraded — not on a fixed schedule. Signs include a coupler that will not stay on the fitting, grease leaking at the coupler joint, jaws that will not engage or release after cleaning, and visible damage. Check that the replacement matches your hose thread, fitting types and the gun’s pressure rating.
Why does my gun work on some fittings but not others?
The gun is probably fine and the fittings are the variable. A blocked, worn or deformed zerk will not accept grease and can hold pressure against the coupler. Test the gun on a known-good fitting; if it delivers there, service or replace the fittings that refuse grease.